Monday, July 8, 2013

Summertime Spring Rolls

Last week, as I was planning dinner for the week, I wanted to find some light and healthy recipes to make.  Not only did they need to be light and healthy but the recipes needed to be simple as I did not want to buy a million ingredients to make one night's worth of food.  I know I am not the only that thinks that way.  I was Pinteresting around and came across a picture of shrimp and avocado spring rolls.  I like shrimp.  I like avocado.  I like spring.  I like rolls.  So there you go!

I remember there was a week or so when I was younger when my mom went through a phase of making spring rolls.  I'm not talking like one or two spring rolls, but like we-were-going-to-eat-spring-rolls-for-two-weeks kind of amount.  That's a lot.  And naturally I got soooo sick of them.  Don't get me wrong, they were so delish, there was just too many of them and I needed variety.  Like a steak.  Yummm steak.

Anywho, ingredients for spring rolls are simple and easy to find even at regular grocery stores (as opposed to thinking you must go to an Asian specific store.  Here are the ingredients I included in my spring rolls:

  • cucumbers
  • green leaf lettuce
  • basil
  • cilantro
  • avocados
  • carrots
  • red cabbage
  • cooked shrimp, sliced in half lengthwise
  • dried bean threads, aka vermicelli or rice noodles I think
  • spring roll wrappers
To make spring rolls, it's all about the preparation.  Assembling them is not difficult as long as you don't over stuff them causing the delicate wrappers to rip.  But prepping all the ingredients so they are ready to go is the key!  Slice the cucumbers and avocados, chop the lettuce and herbs, cook the shrimp and slice them in half and to make it easier on me I brought pre-sliced carrots and cabbage that was already shredded. 
As for the rice noodles, I remember my first experience with this weird stuff.  I totally ruined it back in the day when I thought I was suppose to treat it like regular noodles and boil the stuff (think ramen).  However after reading instructions, you're suppose to boil water, then take it off the heat and soak the rice noodles in there for about 5 minutes then drain.  Mix it with some rice vinegar and line it up with the other ingredients on your assembly line.

For the spring roll wrappers, this was my first time working with these as well.  I poured hot water into a glass pie dish and dipped one wrapper at a time to soften it.  See the wrappers are dried, weird and stiff paper thin things that come to life after soaking for about 15 seconds in the hot water.  It was tricky getting them out because the water was so hot it burned my fingers so I had to use chopsticks but then it was too slippery.  Ah, such issues I have.  :)  Just kidding.  Eventually the water cooled down a little to where it was bearable to touch and grab the wrapper out.  I placed it on a piece of parchment paper and started assembling.  Another key to a successful spring roll is not to over fill it.  I'm such the fan of the philosophy "more is better" hence the reason I like all you can eat buffets so much. But if I overfilled the spring roll it would make it quite difficult to roll up and as a result it would just fall apart and that is an epic fail (see pic below).  Ok, not an epic fail, but not good.
After a while, I got the hang of it and make around 12 of them.  I didn't want to bother with a homemade peanut dipping sauce so we got some premade sauce in a jar and added chopped peanuts for additional crunch. 

I plopped them in front of my husband for dinner and after his first bites, he praised how amazing they were and that this was the new most amazing thing I've ever made!!!  I don't remember the old most amazing thing I've ever made.  Oh well.  We devoured almost all of them and managed to stop ourselves from eating the last two so they can be saved for his lunch the next day.  I think next time i will switch out the basil and cilantro and go a more traditional route with mint.  I'd also like to add small slices of chicken with the shrimp.  YUM!


Tuesday, June 18, 2013

Father's Day Feast

Best Dad in the World
Dang, those chicken legs are humongous!
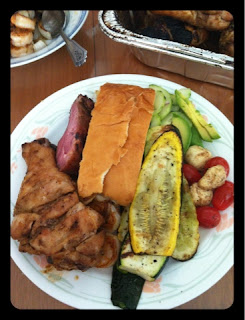
My dad is the best in the world.  No really, he is.  You think your dad is the best?  Well my dad is better.  tee hee.  Thank you dad for all you do for me.  Thank you for killing spiders in the house, thank you for letting me trade cars with you so you can take my car to Frank's for a tune up and oil change, thank you for yummy Costco hot dogs, thank you for installing new toilets in the house when we moved home, thank you for putting up with Tim in the house for two years, and thank you for loving me.  Father's day was a little rough for Tim and I as we are still fighting this darn cold.  But I didn't want to miss celebrating a special day with my daddy.  Mom cooked some Chinese style BBQ ribs and chicken , marinated some cucumbers and cooked rice of course.  I helped grill some zucchinis and squash on their new BBQ! I also had a craving for garlic bread, caprese and fruit popsicles.  Oh, and avocados were on sale so why not?  Dad loves avocados.  So yes, I got all of those too.  Best part is when I asked my mom how she marinated the ribs and chicken her response was (in a Chinese lady accent) "Oh, I use whatever I have.  Kat-sup, soy sauce, oyster sauce, green onion..."  So random.  Maybe I'll look up a recipe for Chinese style ribs.  Anyway, Happy (couple of days later) Father's Day!


Monday, June 17, 2013

It Stinks Being Sick

It's like 7-10 days of awfulness.  My energy has been completely drained out of me and to top that off my taste buds are out of whack!  Luckily, my tasting abilities were around 76% working right Saturday and just in time to take Big B to his first Korean BBQ experience.  For those who haven't been, typically Korean BBQ in Southern CA is a grill yourself all you can eat meat-tastic adventure.  Big B wanted to go somewhere California-y (he already went to In N Out) and what's more California-y than all you can eat?  Thus, we took him to Gen in Tustin.  Located about 6 minutes away from our home, the wait could be up to 2 hours but we got there before noon and it was about a 15-20 minute wait.  YAY!

Big B grilling up some brisket!
We got seated and waiting for us were various banchan or side dishes that included kimchi, pickled daikon (one of my favs), bean sprouts and potato salad (random I know).  Also, a yummy salad and side of white rice balanced my meal with the tons of meat we ordered! 

Here's what we ordered:
Gen Signature Prime Steak
Beef Bulgogi (marinated sliced beef)
Chadol (thin sliced brisket)
Hawaiian Steak (terriyaki marinated and pineapple)
Chicken Bulgogi
Garlic Chicken with Jalapeno Cheese Fondue
Spicy Pork
Mushrooms & Onions

Whoa, when I type that out, that's a lot!  It is so delicious though.  And Gen is awesome because it's only $20 per person!  Sure, in LA my friend Adonis took me to an AYCE KBBQ lunch for $12.99 but still $20 at Gen is not bad considering it's so close.  The service is really great and the atmosphere is really fun.  A shower is a must after eating here because your clothes, hair, skin will all smell like KBBQ afterwards!  However I would find that quite enjoyable!!

Friday, June 7, 2013

What I've Been Up to since November 2012

Here is a little slideshow of all the fun things I've been doing in the kitchen during my blog hiatus. 


Wednesday, June 5, 2013

I HEART SPAM

I just wanted to share with you my favorite How to Make Spam Musubi YouTube video. 


Spam musubi is the best and I wish I can eat it everyday.  Alas, my heart and cholesterol levels probably would not be happy. 

Isn't this beautiful?   Spam musubi from the ABC Store on Maui when I went in November 2012.  This is true paradise.
 
These are the Spam musubis my husband's friend and I made for his snack throughout the week.  Behind them is my Spam musubi lunch bag I got on my honeymoon in 2011 in Maui.

Tuesday, June 4, 2013

Shiny (somewhat) New Toy

I got my new toy, Ruby, for Christmas, but wanted to share her with you all today.  Thank you to my husband, sister, and her BF for my present.  She's amazing!


Monday, June 3, 2013

Kermit the Frog Cookies

So since my last post (like forever ago, and I'm very sorry for that) I've been baking away goodies for friends and family!  I even received a shiny new Kitchen Aid for Christmas!  This has made things much easier now that I can turn the magic switch on and walk away.  It's been fantabulous in the kitchen!

More exciting news has occurred the last few months during my bloggy hiatus.  We bought a home!  So now we have our own little kitchen to make a mess in.  And trust me, it's a mess.  Well actually, no it's not.  My husband likes clean things and so I feel like I clean ALL the time.  Ahh... being an adult is no fun.  Haha, just kidding.

I've been baking and decorating various cookies for various occasions (and my next post will be pictures of them), but my latest favorite were these Kermit the Frog cookies I did for one of my BFF's daughter's 3rd birthday.  The little now 3 year old had been talking about have a Muppets themed birthday party for many months now and I was asked to make Kermit cookies.  I searched Amazon.com and local bake shops for Kermit cookie cutters, but couldn't find anything except an antique Kermit cookie cutter that cost $20 plus shipping.  So I gave up...until I thought of this:

1. First I went to Pinterest because where else would I find samples of Kermit cookies?  Unfortunately none of the pins gave me specific instructions.  Thus, this blog post.  You're welcome.  :)

2. Print image of Kermit and cut out.

3. Purchased Edible Pens (Foodoodler, $6.99 at Sur la table) to trace Kermit onto baked cookies  Thank goodness the image I cut out was just the right size because I don't have a printer at home and I already baked all the cookies.

4.  Take black royal icing piping (I used a size 3 tip) and trace the outline of Kermit on the cookies  Let dry.


5. Fill in one section at a time on the cookies.  Here is the order I filled in with the different colors used.  You don't have to go in this order, but I felt this would be the easiest way for myself.  I also just made a big batch of royal icing and started with the smallest areas first so that I can save the rest for the largest area which was the face. Honestly, I don't like wasting royal icing because I don't make cookies often enough to need to keep leftovers around and I'm really lazy and don't want to make more during this process of decorating.  I know I'm not the only out there that feels this way... right?

I used Wilton's Color Icing, $2.50 at Sur la table.
  • Eyes (white-no color icing needed)


  • Tongue (pink)

  • Mouth (Red Red)

 
  • Ruffly Neck Area (What the heck would you call that?) (Leaf Green)

  • Face (Kelly Green)
 

6.  Use the black piping (tip size 3) to add a line and dot in the middle for his eyes!  At this point, he has really come alive!

7.  Let dry overnight, and wrap them individually with cute matching ribbons.

 
I wanted to add purple polka dots around Kermit but his face was so big I didn't have room. Oh well.


I love how they turned out and want to use this technique for everything I can't find cookie cutters for!  I was asked "How did I do this?" And I was happy to respond, "With time and patience."  So I advise you when making a batch of these (I made 30) or with anything you do, have some patience and take your time. 

(The real answer is that I made the dough, cut out circle shape and baked all the cookies on night #1 [around a couple of hours]; trace, piped and filled in the image on night #2 [around 7-8 hours], and bagged and ribboned them all on night #3 [around 30 minutes])